Table of Content
The petals should be layered and staggered so that the flower grows outward. The cutting, folding and gluing techniques of the flowers and the flower templates are too feasible and with the help of the detailed tutorials you can easily learn them all. So wait no more and have some fun this weekend to create one of these of many of these diy paper flowers and satisfy your crafting thrust in the best possible way. And We have also published a post on DIY Fabric Flowers that your can make more from fabrics.

If we browse YouTube a lot more, we will discover an infinite number of models to make, from the simplest to the most complex. Press carefully from the center to make the base of the flower. Use another object with a smaller diameter to make the circumference on the green cardboard. The 3rd row of petals I glue in the same way, but already taking a step towards the center.
Easy crepe paper flowers for beginners
First you should feel the crepe paper in your hands, pull it and stretch it, get used to it, and then move on to something more advanced. Crepe paper is very different from cardstock paper because you can give it any desired shape. The airiness and fluffiness of flowers made from crepe paper are simply impossible to compare with flowers made from any other paper. Grab a pair of scissors and cut the ends of the stack of tissues based on the shape you want your flowers to assume. So, feel free to experiment and play around with the color at this juncture. Also, remember that the more layers you add, the thicker the stack and the fluffier or more lush the flowers turn out.

Be careful not to overdo it when spreading them all around the wreath and add them at random intervals. You won't need much more than paper and some sharp scissors to create beautiful paper snowflakes at home. We glue the part that does not have cuts with glue and wrap it around the stem, one leaf higher and another much lower, and with this step we offer our flower as finished. After making the cuts, we open the paper and we will realize that we have two precisely equal halves. With the scissors we separate the two parts, with this gesture we now have two identical flowers. To speed things up, I fold the paper four times and start cutting it into small strips, leaving about half an inch uncut.
How to make paper flowers step-by-step
The rule of thumb is that the more paper you use, the thicker and bigger your flowers will turn out, irrespective of the size of every individual sheet used. A small-sized flower will typically take between 7-9 sheets of paper, measuring about 3” x 5”. A larger flower, on the other hand, measuring around 4” x 6”, will take anywhere between 9-12 sheets of paper. Spread every single layer and individual paper petal out and separate them from the stack. For example, you can cut the stacks in a tapering V, a curved U, or even into stripped ends, as seen below.
So I fold two blanks in half and step from the lower edge, maybe about half an inch, I cut to the middle point, and then I just round the top part. I also have a separate blog post and video about how to make petals from crepe paper, and in general, how to work with it. Hydrangeas are a very popular flower to have as home decor right now. I love that with this tutorial, you can make them individually to put in a vase, or make them into a wreath as you see below. Now, you can make any kind of flower out of paper that you want. Depending on the size of the flower you want to make, stack the tissues and align them.
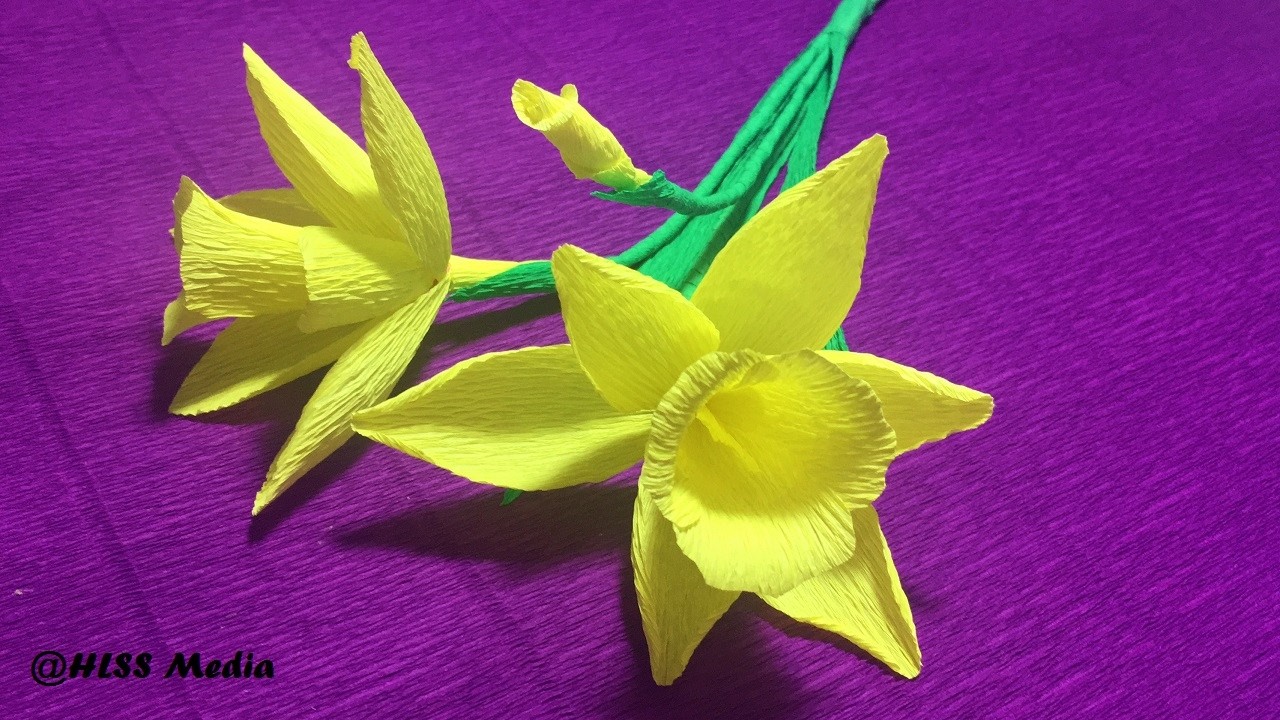
Paper Flower Wedding Bouquet
For each flower, you'll need 3 or 4 sheets of tissue paper.When you've chosen your tissue paper, place them together, lined up in a pile. Unroll and secure the bottom with a dab of hot glue if desired. Take the pencil or Q-tip out and you'll be left with a rolled paper that looks very much like a flower. To keep it together, dab the bottom side with hot glue – and you're done.
Grab your glue and apply some over the first arc petal, as shown below. The two main enemies of crepe paper are direct sunlight and moisture. Therefore if you keep the flowers in a well-ventilated, non-humid place, and keep them out of direct sunlight, they can last for a very long time. If you want a more romantic, whimsical rose then this is the tutorial for you! Just look at how romantic these paper roses look! This one will really give you some roses that have bloomed and can work for any color or any size too.
Level up your paper flower craft!
Then fold the paper in half so it makes a smaller triangle. Then cut the top off and you'll be left with a triangle which becomes the base of your snowflake. Tissue paper flowers are a super easy craft anyone can make. They're cute, budget-friendly, and fun to make. Evermine has a DIY paper flower tutorial for creating giant wedding pom-poms made from tissue paper. These are great for wedding photo booth walls and reception tables.
With this technique, they look even better in groups, so don't stop now. Make a few to stick together to make their beauty exponentially more remarkable. You can also use cardstock or construction paper, too, and it’s quicker and cheaper. You just won’t have the soft gradient of watercolor paper; however, you could choose a more vivid color with this type instead.
Create a whole flurry of snowflakes from the same material, or mix and match different materials for a more intricate look. To make your display even more magical, finish your paper snowflakes with glue and clear glitter for a subtle glistening effect. The last step is to glue the center to the flower very well. After the first row, I turn the flower over and glue the 2nd row, placing the petals between the petals of the 1st row. First I flip the base and start by gluing the 1st row of petals from the back side. Also, make sure you don’t overstretch the paper.
When the paint is dry, create patterns over the papers in different colored paints and colored pencils. Draw lines, spots and squiggles, grids, scribbles and zigzags. Splatter paint, use different paintbrushes and your fingers – get messy!
You are free to add extra ornaments as you see fit. Once you're done cutting and snipping, find a creative way to display your paper snowflakes. The best part about this craft is that you can recreate the magic of a fresh snowfall without the freezing temperatures or the mess. Use clear tape to show them off as part of a holiday window display. Or, use fishing wire to hang them from the ceiling, staircase, or festive Christmas mantel.
These paper flowers use a variety of materials such as cardstock, scrapbook paper, tissue paper, metallic text-weight paper, and crepe paper. You'll be using these materials to make DIY paper flowers like roses, peonies, dahlias, anemones, cherry blossoms, and other pretty flowers that you'll love creating. These DIY paper flower tutorials will teach you how to create beautiful flowers that will never wilt. These are perfect decorations for parties, backdrops for weddings, bouquets, and even individual flowers that will look great anywhere in your home. Paint watercolor paper or use cardstock or construction paper.


No comments:
Post a Comment